How to DIY Replacing Whirlpool Electric Cooktop Glass - Model RCC3024
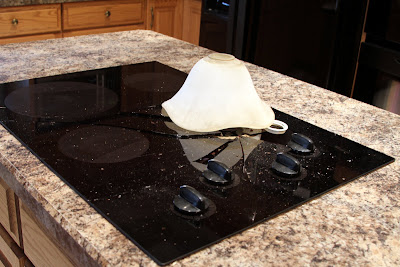
So our light in our kitchen decided to drop onto our glass electric cooktop. We suspect that the glass retainer ring wasn't screwed on all the way, and the globe light bulb just gave out. Either way our nice Whirlpool 30 inch (Model RCC3024) stove cooktop was broken. Here's the pictures of my broken cooktop and the rest of this blog post shows how simple it is to replace (I didn't find a good pictures or video on the web of the process). Hopefully this helps you do it yourself.


I immediately went online to see if I could get a replacement cooktop glass from the fine folks at http://www.repairclinic.com. I had bought several appliance parts over the years and they have always had the parts and been fair on the pricing and shipping.
After typing in my model number (Whirlpool RCC3024LB01) I got to this page http://www.repairclinic.com/Shop-For-Parts/a13b5d622616/Model-RCC3024LB01-Whirlpool-Range-Stove-Oven-Parts told their filter the part I needed was over 29" and there was my black cooktop glass http://www.repairclinic.com/PartDetail/Glass-Cooktop/8285096/939873?modelNumber=RCC3024LB01.
The price was a reasonable $248 plus $8 for shipping. It arrived 8 days later.
The replacement cooktop glass also also seems to be available on Amazon now with a little cheaper shipping (if your a prime member).
The box was double packed and I was pleased Fed-ex didn't break it. This is the view of the bottom of the new cooktop replacement glass. Note the metal around the bottom of the glass. It's what holds the cooktop to the metal box. It would have helped to know this beforehand. First I shut of the power to the stovetop at the breaker panel. The 6 minute cooktop glass replacement video is pretty helpful here.
The box was double packed and I was pleased Fed-ex didn't break it. This is the view of the bottom of the new cooktop replacement glass. Note the metal around the bottom of the glass. It's what holds the cooktop to the metal box. It would have helped to know this beforehand. First I shut of the power to the stovetop at the breaker panel. The 6 minute cooktop glass replacement video is pretty helpful here.

Beneath the stovetop are two screws that hold the cook top against the counter top. After unscrewing both I could push the cooktop out of the counter top from beneath the cabinet. After getting the cooktop out I loosened the screws that held the glass to the metal box. I had 12 of them holding it in.
Here is a closeup of the angle iron that is silicone to the bottom of the stove top glass. The new top comes with them already installed. There were screws that held the glass to the stove top box.
I removed the knobs from the the stove (they just pull off), transferred some rubber grommets to the new cooktop, and grabbed two metal brackets that distribute the force from the screws across the cooktop. The new glass just fit over the metal box and replaced the screws.
The new replacement glass stovetop did not come with the foam tape -I'm going to get some thin weatherstripping from the hardware store to cushion the surface between the stovetop and the glass, but I'm not sure it's required.

Here's the beautiful new glass cooktop (with a reflection of the evil pendant in it). The whole process took about 15 minutes (and a screwdriver) from the time I unpacked the new glass to putting dropping the new glass one in. I also captured it in my 6 minute video on replacing your glass stovetop (same link as above).
I suspect that it would be very similar for other brands of cooktops or replacing a bad burner, so hopefully this helps you out.


+Box.JPG)
Thanks so much Dave. Our KitchenAid cooktop is broken and now that I watched your video I am going to try and talk my husband into doing the repair ourselves. This was the only video I could find on-line. We will spend less than half of what I thought it might take to fix it.
ReplyDelete