Davis Vantage Pro 2 Envoy, Vantage VUE, and USB Weatherlink Unboxing
I decided to take the plunge and buy a Davis Vantage VUE weather station for my house. I wanted a quality unit that I wouldn't have to mess around with that reported reliable results. I also didn't want to pay a fortune for what is really a hobby. I planned this to be the perfect compliment to the McHenry Illinois radar weather that shows on my family website.
 |
| ISS Sensors (big brown box - back), Weather Envoy (white box - left), and USB datalogger and software |
After talking with application specialist at Davis Instruments I came to the conclusion that to meet my needs I needed:
- Vantage Vue Wireless ISS (Integrated Sensor Suite) -6357
- Vantage Pro2 Weather Envoy - 6316
- USB data logger with WeatherLink software - 6510USB
For me this made sense, since I wanted:
- To measure a variety of outside parameters
- Publish frequent measurements to the web (always available anywhere from my smartphone) and measure long term weather trends
- Convenience of wireless transmission from the sensors to my computer
- Clean installation. I didn't want or need the traditional LCD console (plenty of computers, phones and tablets in my house)
- Ability to easily publish weather station data to 3rd party websites to help the community
What follows is a review of the products and the assembly of the system.
 |
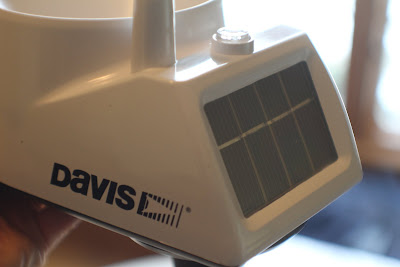
| Solar panel - minimizes battery use by the sensors Level bubble (top) helps assure level sensor mounting |
The solar panel is a pretty neat design. With it facing southern sunlight you are supposed to be able to get greater than 2 years from the CR-123 lithium battery. Eventually I want to mount ours on our roof and getting up there to change a battery to frequently would be a real pain. The battery is rated at 8 months with no sunlight.
 |
| Small parts and hardware for ISS |
The sensor assembly had good quality components and everything I needed included.
 |
| Tipping Bucket Rain Gauge (7345.280) assembly - before installation |
The rain collector assembly is real easy to fit into the housing. It also seems like it would be easy to replace if it were ever to have a problem. It's a tipping spoon type with 0.01" resolution.
 |
| Inserted the battery and the sensor array LED began blinking green |
Once the unit is powered up it needs at least 10 minutes to connect up with the Envoy (or the console). The two units need to be at least 10 feet away from each other while their locating each other. Since I only had one sensor and Envoy, the defaults were great and found each other with no hassles.
 |
| Installed the stainless steel mounting hardware (1 u-bolt, 2 washers, 2 nuts, and a bar) |
Next part of the unboxing is the Vantage Pro2 Weather Envoy 6316 and the USB datalogger and WeatherLink software. I also have some pictures of the final sensor assembly.
You can see the data reported by this station at:
https://www.trebacz.com/weather/index.html
Please note that the software I'm running is an wview open source weather software and not the Windows WeatherLink software. I prefer more flexible software that will integrate with my websites easier and run my 24/7 Linux servers.


Comments
Post a Comment